How to Use Windows Apps
How to Log In to the VPN App
Double-click the MillenVPN app on your desktop to open it.
As stated in the [Welcome to MillenVPN] email sent upon contract activation
・Username
・Password
Please enter the two items above and click Login.
How to Connect to a VPN
Select the country you wish to connect to from the list of countries, then click the "Connect" button.
Once it shows "Connected" as shown below, the connection is complete.
Settings
Click the Settings (gear icon) in the left-hand menu of the app to access the settings screen.
General Settings

Language
・Select language
⇒Set the language to use.
・Enable audio feedback
⇒When turned on, MillenVPN will provide voice instructions when performing actions.
System Startup
・Launch the application when the user logs in
⇒The MillenVPN app launches when you log in to Windows.
・Hide the application at startup
⇒When enabled, the MillenVPN app will launch hidden in the system tray.
Application startup behavior
※We apologize, but the "Application Startup Behavior" feature is currently unavailable.
・Do not connect automatically (default setting)
⇒ The application will not establish a VPN connection upon launch.
・Connect to the last server you connected to
⇒When the application launches, it connects to the VPN server you last connected to.
・Connect to the fastest server
⇒Upon application launch, it automatically selects the server with the fastest connection and establishes a VPN connection.
Application Exit Behavior
This is the behavior when you press the × button in the MillenVPN app.
・Close the application
The MillenVPN app will close.
・Hide in the tray
⇒The MillenVPN app does not close; it remains hidden in the system tray.
・A dialog box appears, allowing you to choose whether to quit the application or hide it in the system tray.
Keyboard shortcuts
When turned on, you can use the shortcut function.
For details on the shortcut function, please check the "Information" ⇒ "Help" tab.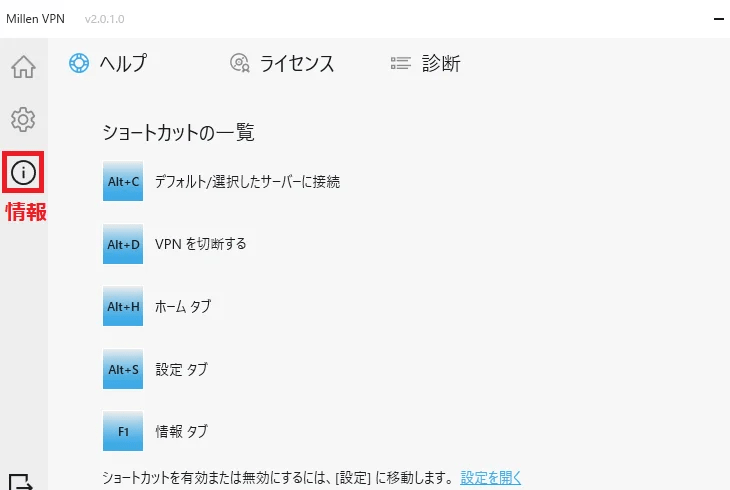
Connection Settings
VPN Protocol

・Automatic
⇒Connects to the optimal protocol from among the VPN protocols.
※ To use OpenVPN TAP Adapter」Installation is required.
・IKEv2 (Recommended setting)
⇒ It provides high stability and security with an extremely fast protocol.
This feature may not be available on some platforms.
・WireGuard
⇒Provides extremely fast VPN service.
This feature is unavailable on networks where UDP is not supported.
・OpenVPN
⇒Provides the highest level of security.
Due to enhanced security, it may be slower than other protocols.
Even when other protocols cannot be used due to firewall restrictions,
OpenVPN may be available.
※ To useOpenVPN TAP AdapterInstallation of [software name] is required.
OpenVPN TAP Adapter
By clicking "Install"You can install the TAP adapter required to use Automatic and OpenVPN.
Connection

・Auto-Reconnect
⇒Enabling this will automatically reconnect if the VPN unexpectedly disconnects.
・Kill Switch
⇒Enabling this prevents communication using your real IP address if the VPN connection is lost.
・Allow local network interfaces
⇒When the VPN is off, all traffic within the LAN will be blocked while the VPN is connected.
When set to On, communication within the LAN will be permitted even while connected to the VPN.
・DNS leak protection disabled
⇒When off, DNS leakage is protected.
⇒When set to On, DNS leakage will not be protected.
・IPv6 Leak Protection Disabled
⇒When off, IPv6 leakage is protected.
⇒When set to On, IPv6 leakage will not be protected.
・Threat Protection
When enabled, it will block ads, trackers, and malicious websites during VPN connections.
This feature may conflict with security software protection functions or cause unintended inaccessibility to websites. If this occurs, please try disabling the setting.
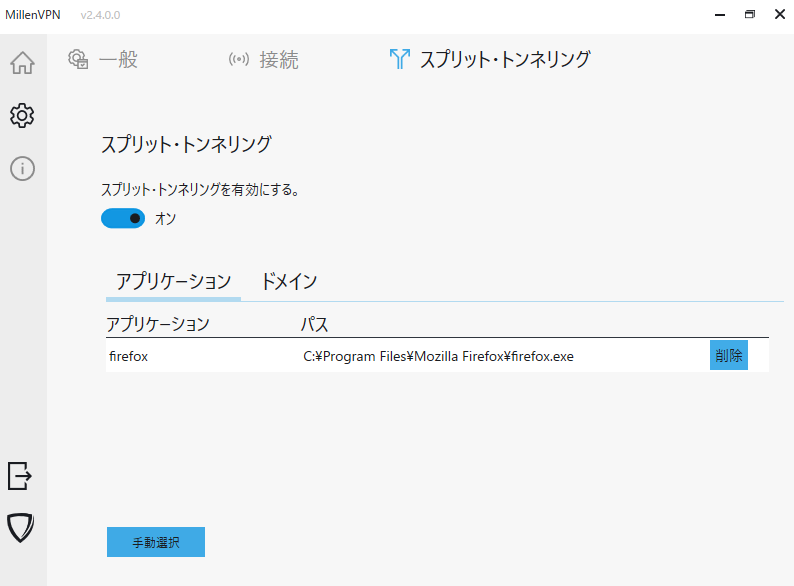
Split Tunneling
You can specify domains or applications that will not be protected by the VPN connection while connected to the VPN.
Please refer to the following for the setup method.
① Go to the Split Tunneling tab in Settings and turn on [Enable Split Tunneling].
② Add any application or domain by selecting it manually.
③ Enable [Allow local network interfaces] in the Connection tab screen.
※Please note that due to current specifications, Split Tunneling settings are not saved when you exit the app, so you will need to reconfigure them each time.