After installing the OpenConnect-GUI application, there are cases where OpenConnect-GUI appears in the taskbar, but the application cannot be opened or the connection screen does not appear when clicking on it.
The above may have been caused by changing the screen settings, display assignments, or display to be used on the customer's device.
Please note that the following operations are performed at your own risk, as they involve changing the settings of the device you are using.
Correction of window location information (registry)
(1) Completely terminate OpenConnect-GUI.
Open Task Manager ( Ctrl + Shift + Esc ), select openconnect-gui.exe if it is in the process list, and click "End Task".
(2) Start the Registry Editor.
Press the Windows key + R key simultaneously to open the "Run" dialog box.
Type regedit and press the Enter key.
(3) Navigate to the appropriate path.
Copy and paste the following path into the address bar at the top of the screen and press Enter:
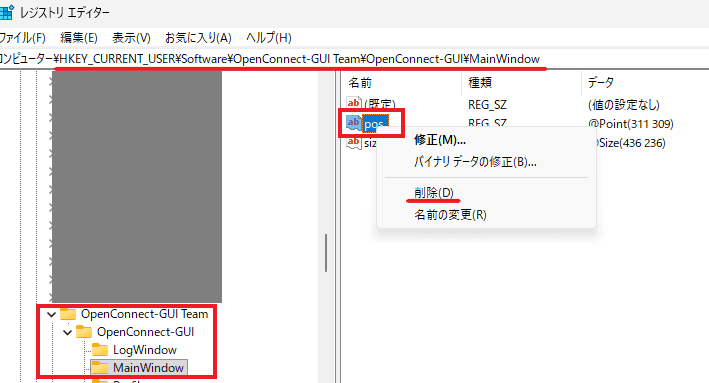
HKEY_CURRENT_USER\Software\OpenConnect-GUI Team\OpenConnect-GUI\MainWindow
(4) Delete location information (pos).
With the MainWindow folder selected, find the value named pos in the list on the right.
Right-click pos and select "Delete".
(5) Close the Registry Editor.
(6) Check if OpenConnect-GUI can be started.
If the above methods do not solve the problem, please try the following compatibility mode.
Running in compatibility mode
1) Right-click on the OpenConnect-GUI executable file (usually located at C:\Program Files (x86)\OpenConnect-GUI\openconnect-gui.exe etc.) or desktop shortcut.
(2) Select "Properties".
Open the "Compatibility" tab.
4) Check the "Run this program in compatibility mode" checkbox and select "Windows 8" from the drop-down.
(5) Click "Apply" and then "OK", then check if OpenConnect-GUI can be started.