How to Use MillenVPN Dedicated Server OpenConnect on Windows
Verifying OpenConnect Connection Information for MillenVPN Dedicated Servers
Log in to My Pageand within the valid service "MillenVPN ○○○○ Connection InformationClick "".
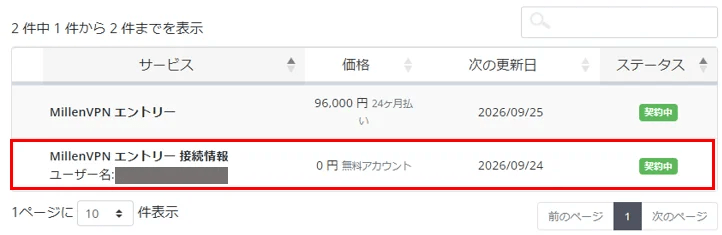
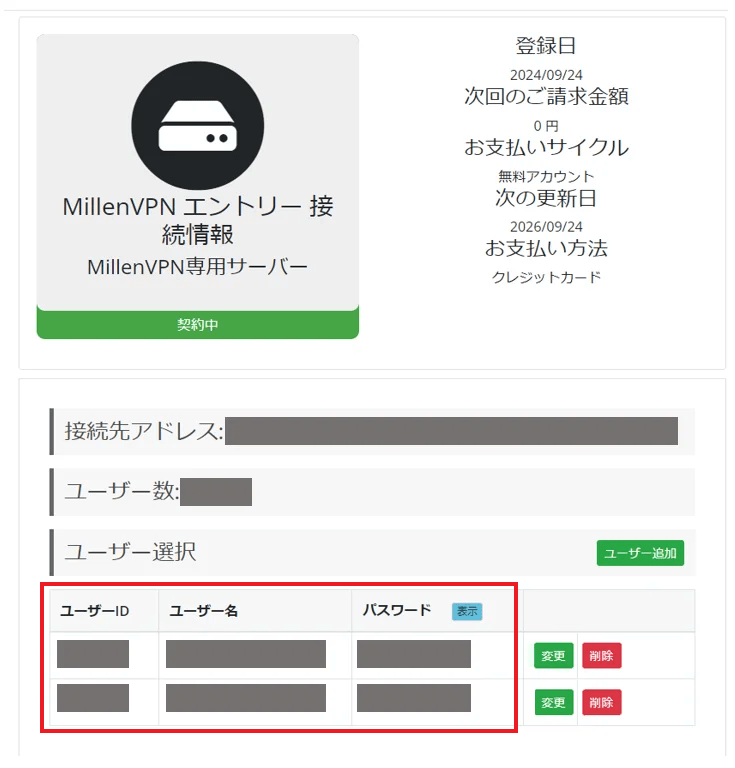
You can check the connected account and the destination address.
※Please note that the password for MillenVPN and MillenVPN Native is different.
How to Set Up Windows
To use the MillenVPN dedicated server OpenConnect on Windows, you need to install the software.
This procedure allows you to begin using MillenVPN Native OpenConnect on Windows 10/11.
1. Download the client from the link below.
OpenConnect-GUI v1.5.3 (Stable Release)
2. Double-click the downloaded file to run it.

3. If you see the message "Do you want to allow this app from an unknown publisher to make changes to your device?", click "Yes".
4. The installation will begin. Click "Next."

5. The license agreement will appear; click "Agree."

6. The Install Options screen will appear. Check the "Create openconnect-gui Desktop Icon" box and click "Next".

7. This is the installation destination settings screen. Click "Next".

8. This is the Start Menu settings screen. Click "Next."

9. This is the component selection screen. Click "Install".

10. When prompted with the question "Do you want to install this device software?", click "Install".
11. The installation is complete. Click "Finish."

12. The OpenConnect GUI will launch. Click the gear icon, then click "New profile (advanced)".

13. The New Profile screen will appear. Enter the information below and click "Save & Connect".
| Name | Enter your preferred name (e.g., MillenVPN) |
| Gateway | Enter the server address to connect to ▼How to Check the Server Address 1) Log in to My Page https://accounts.millenvpn.jp/clientarea.php 2) Click on the service 3)MillenVPN ○○○○ Connection InformationClick 4) Within the page opened in 3)MillenVPN ○○○○ Connection Informationwill be displayed in the "Destination Address" field. ※ Please note that this differs from the connection server address for MillenVPN Native OpenConnect. |
| Username | Enter your username ▼How to Check Your Username 1) Log in to My Page https://accounts.millenvpn.jp/clientarea.php 2) Click on the service 3) MillenVPN ○○○○ Connection InformationClick 4) On the page opened in 3), "Customer'sMillenVPN ○○○○ Connection Informationwill be displayed. |
| Batch mode | Check ON |

13. Click "Connect" to connect to MillenVPN Native OpenConnect.

14. The first time you connect, a permission screen will appear. Click "Accurate information."

15. Enter your password. Enter the "Connection Password" you confirmed on your My Page.
▼How to Verify Your Password
1) Log in to My Page
https://accounts.millenvpn.jp/clientarea.php
2) Click on the service
3) MillenVPN ○○○○ Connection InformationClick
4) On the page opened in 3), "Customer's MillenVPN ○○○○ Connection Informationwill be displayed.
※ Please note that this password is different from the one used for the MillenVPN app, MillenVPN Native, or OpenConnect.
※ The password for the MillenVPN dedicated server is,Change from My PageIt is also possible to receive it.

17. Connection complete.

16. From next time on, simply launch "OpenConnect-GUI" and click "Connect" to connect to the MillenVPN dedicated server via OpenConnect.

Troubleshooting
OpenConnect-GUI v1.5.3 (stable version) may not function on certain environments, such as Windows 10 32-bit. In such cases, please try using OpenConnect-GUI v1.6.2 available at the link below.
How to Install OpenConnect-GUI v1.6.2 on Windows | MillenVPN Help Center
In some Windows environments, when using the [OpenConnect-GUI v1.5.3 (Stable)] mentioned in the article below, e.g.: "Cloud not open"
